In this step you will learn how to set-up the infrastructure needed to load and display an NShape diagram.
Every NShape program requires a Project component, which represents a set of diagrams belonging together. A project has a name and assembles the central services of NShape. A most important service is the repository, which is responsible for caching and storage. It uses a Store object to persist the project's data. NShape currently provides an XmlStore component and a SQLStore component out of the box, but additional stores can be conceived and either added by an NShape application programmer or be integrated in the framework.
With project and repository alone, it is possible to load, create and save projects, but not display any diagrams. For this purpose, you need a Display, which must be tied to a DiagramSetController. The DiagramSetController is responsible for all logical operations on displayed diagrams, while the Display contains the presentation logic and the actual Windows Forms control to draw diagrams on the screen. This separation between controller and presenter is a pattern that NShape consistently employs to tie user interface components to diagramming logic.
How to create a basic NShape application:
| 1. | Create a new Visual C# Windows Forms application. |
|
NShape requires System.Windows.Forms which is NOT included in the ".NET Framework Client Profiles".
Therefore, the target framework of your application has to be a ".NET Framework Full Profile"
|
| 2. | If you are if you are using Visual Studio 2010, right-click the project node in the solution explorer and select "Properties".
Switch to the "Application" tab and change he target framework from ".NET Framework 4 Client profile" to ".NET Framework 4". |
| 3. | Open the main form, open the toolbox, right-click and select Add Tab. Call the new tab NShape. |
| 4. | In the toolbox, right-click in the NShape area and select Choose Items…. |
| 5. | In the dialog Choose toolbox items, click Browse, navigate to the bin subdirectory of the NShape installation folder (by default this is C:\Program Files\dataweb\NShape or C:\Program Files (x86)\dataweb\NShape), select the assembly Dataweb.NShape.WinFormsUI.dll and click OK twice.
Now the NShape area in the toolbox is filled with nine NShape components. |
| 6. | Add a second assembly, the Dataweb.NShape.dll in the same way. You have now 21 NShape components (plus the Pointer tool) in the toolbox. |
| 7. | Drag the Display component on the form and set its dock property to fill. |
| 8. | Double-click on the Project component in the toolbox to add it. |
| 9. | Double-click on the DiagramSetController component in the toolbox to add it. |
| 10. | Set the Project property of the DiagramSetController to the project1 component. |
| 11. | Set the DiagramSetController property of the display1 component to the diagramSetController1 component. |
| 12. | Double-click on the CachedRepository component to add it and set the Repository property of the project1 component to cachedRepository1. |
| 13. | Double-click on the XmlStore component to add it and set the Store property of the repository component to xmlStore1. |
| 14. | Double-click on the form caption to create a Form1_Load method and put the following code into it: |
// Set path to the sample diagram and the diagram file extension
xmlStore1.DirectoryName = @"C:\Documents and Settings\All Users\Common Files\NShape\Demo Projects";
xmlStore1.FileExtension = "nspj";
// Set the name of the project that should be loaded from the store
project1.Name = "Circles";
project1.LibrarySearchPaths.Add(@"C:\Documents and Settings\All Users\Common Files\NShape\bin\Debug");
project1.AutoLoadLibraries = true;
// Open the NShape project
project1.Open();
// Load the diagram and display it
display1.LoadDiagram("Diagram 1");
|
|
You must replace the file paths to the actual paths on your system. They depend on the Windows version and Windows language you have.
|
|
We recommend to place the code inside a try/catch exception handler in order to handle errors. Please note that exceptions in the Form.Load event handler will be catched by the base class (and disappear if the debugger is attached) if you do not handle them.
|
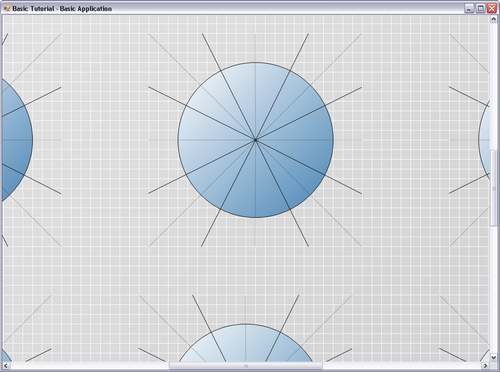
| 15. | Run the application, it will display the diagram. |

WebVisits display the Circles.xml diagram.
A few comments on the given code might be in place here:
| • | The directory name of the store determines where the XML store searches the NShape project file. |
| • | In the case of the XML Store, the project name determines the file name of the NShape project file.
In the example, the complete file path is C:\Documents and Settings\All Users\Common Files\NShape\Demo Projects\Circles.nspj. |
| • | The library search paths define, where the project looks for shape libraries. This will be covered in more detail later in this tutorial. |
| • | Opening the project, opens the project file and loads all diagrams and other project parts in memory. |
| • | The LoadDiagram method of Display loads the diagram from the repository and displays it. |
Tutorial Navigation


