To Fill the Toolbox Manually
In the previous chapters, you learned about the simple and easy solutions. But what if your application internally works with templates the user should not see in the toolbox? Or the category names in the toolbox do not suit your needs? In these cases you have to clear the toolbox' contents after the project have been opened/created and refill it yourself. This approach is the most flexible one and can even be combined with the "Loading a Template Project" approach. Please make sure you have read this chapter and know about the advantages and disadvantages of this technique.
The following refers to exactly this combination, creating the tools from templates loaded from a predefined template project, because it's more comfortable to implement.
| 1. | Load the template project. Refer to "Load a predefined template project" on more details on how to create a predefined template project. |
string templateProjectPath = @"C:\Users\Public\Documents\NShape\Demo Projects\Railway Network.nspj";
xmlStore1.DirectoryName = Path.GetDirectoryName(templateProjectPath);
xmlStore1.FileExtension = Path.GetExtension(templateProjectPath);
project1.Name = Path.GetFileNameWithoutExtension(templateProjectPath);
project1.Open();
|
| 2. | Clear the ToolSetController's contents in order to dispose all tools that were automatically created from the existing templates |
toolSetController1.Clear();
|
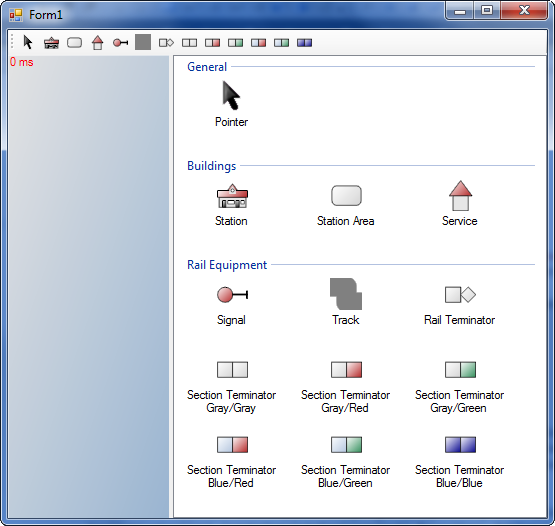
| 3. | Now get the all templates the user should work with and create tools. In this example, tools are created with a custom category name. |
// Create a tool with category name "General"
toolSetController1.AddTool(new PointerTool("General"), true);
const string categoryBuildings = "Buildings";
toolSetController1.CreateTemplateTool(project1.Repository.GetTemplate("Station"), categoryBuildings);
toolSetController1.CreateTemplateTool(project1.Repository.GetTemplate("Station Area"), categoryBuildings);
toolSetController1.CreateTemplateTool(project1.Repository.GetTemplate("Service"), categoryBuildings);
const string categoryEquipment = "Rail Equipment";
toolSetController1.CreateTemplateTool(project1.Repository.GetTemplate("Signal"), categoryEquipment);
toolSetController1.CreateTemplateTool(project1.Repository.GetTemplate("Track"), categoryEquipment);
toolSetController1.CreateTemplateTool(project1.Repository.GetTemplate("Rail Terminator"), categoryEquipment);
toolSetController1.CreateTemplateTool(project1.Repository.GetTemplate("Section Terminator Gray/Gray"), categoryEquipment);
toolSetController1.CreateTemplateTool(project1.Repository.GetTemplate("Section Terminator Gray/Red"), categoryEquipment);
toolSetController1.CreateTemplateTool(project1.Repository.GetTemplate("Section Terminator Gray/Green"), categoryEquipment);
toolSetController1.CreateTemplateTool(project1.Repository.GetTemplate("Section Terminator Blue/Red"), categoryEquipment);
toolSetController1.CreateTemplateTool(project1.Repository.GetTemplate("Section Terminator Blue/Green"), categoryEquipment);
toolSetController1.CreateTemplateTool(project1.Repository.GetTemplate("Section Terminator Blue/Blue"), categoryEquipment);
|
| 4. | Finally, change the project's location. |
xmlStore1.DirectoryName = Environment.GetFolderPath(Environment.SpecialFolder.MyDocuments);
xmlStore1.FileExtension = ".nsp";
project1.Name = "My New Project";
|

Customized ToolBox
The other way, creating templates with code and fill the toolbox manually, is nearly the same as above:
| 1. | Clear the contents of the ToolSetController: |
toolSetController1.Clear();
|
| 2. | Search the desired template in the repository's templates. If the template already exists, an existing project was loaded. Otherwise create a suitable template and insert it in the repository. |
Template roundedBoxTemplate = null;
foreach (Template template in project1.Repository.GetTemplates()) {
if (template.Name == "MyRoundedBox") {
roundedBoxTemplate = template;
break;
}
}
if (roundedBoxTemplate == null) {
RectangleBase roundedBoxShape = (RectangleBase)project1.ShapeTypes["RoundedBox"].CreateInstance();
roundedBoxShape.FillStyle = project1.Design.FillStyles.Green;
roundedBoxShape.LineStyle = project1.Design.LineStyles.Dashed;
// ToDo: Customize shape's appearence
roundedBoxTemplate = new Template("MyRoundedBox", roundedBoxShape);
roundedBoxTemplate.Title = "Rounded Box"; // Used as tool's display name
project1.Repository.InsertTemplate(roundedBoxTemplate);
}
|
| 3. | Now create a tool for the template by calling ToolSetController's CreateTemplateTool method or by creating (and adding) a suitable tool for the template:
A PlanarShapeCreationTool for planar shapes or a LinearShapeCreationTool for linear shapes. |
PlanarShapeCreationTool roundedBoxTool = new PlanarShapeCreationTool(roundedBoxTemplate);
roundedBoxTool.Category = "Generic";
roundedBoxTool.Description = "Creates a rounded shape."; // Used as ToolTip text
toolSetController1.AddTool(roundedBoxTool);
|
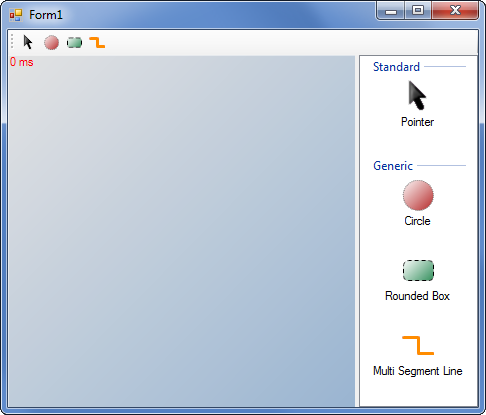
| 4. | That's all. Your tool box should now look like this: |

Customized ToolBox


