Extend Custom Context Menus with NShape Commands
All presenter components with built-in context menus have a ShowDefaultContextMenu property. This property is used for completely override the built-in context menus. By setting ShowDefaultContextMenu to false, no context menu items are created at all, returning control to you. The backside of the medal is, that you normally would have to re-implement all standard actions provided by the presenter components which is not very desirable.
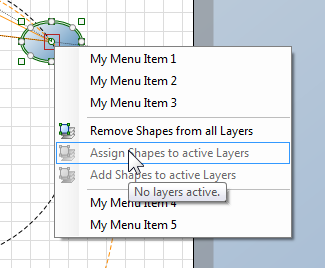
So the best solution is to combine the advantages of both creating your own context menu and relying on built-in actions by creating your own context menu and extending it with items dynamically created from actions of the presenter component:
| 1. | Set the ShowDefaultContextMenu property to false. |
| 2. | Create a ContextMenuStrip component by dragging it from the IDE's tool box onto your form. |
| 3. | Create all context menu items that should extend the presenter component (e.g. a Display) as sub items of the ContextMenuStrip created in [2]. |
| 4. | Assign the ContextMenuStrip created in [2] to the presenter component (e.g. a Display). |
| 5. | Give all your context menu items a descriptive name so you can identify them within the program code. |
| 6. | Create an event handler for ContextMenuStrip.Opening. This is where you create menu items from NShape MenuItemDefs provided by the presenter component.
To put it in a nutshell, you have to... |
| i. | fetch all MenuItemDefs from the presenter, |
| ii. | filter out the MenuItemDefs you want to include in your context menu, |
| iii. | create a ToolStripMenuItem from a MenuItemDef and |
| iv. | insert it into the ContextMenuStrip |
Your code might look like this.
private void myContextMenuStrip_Opening(object sender, CancelEventArgs e) {
// Get index of item where to insert
int insertPos = myContextMenuStrip.Items.IndexOf(toolStripMenuItemSeparator2);
// Process all MenuItemDefs provided by the IDisplayPresenter
foreach (MenuItemDef itemDef in display1.GetMenuItemDefs()) {
// Skip separators, prohibited items and items with sub items (for simplicity)
if (itemDef is SeparatorMenuItemDef) continue;
if (!itemDef.IsGranted(project1.SecurityManager)) continue;
if (itemDef.SubItems != null) continue;
// Get wanted items (all layer commands in this simple case)
if (itemDef.Name.ToLower().Contains("layer")) {
// Build ToolStripMenuItem from MenuItemDef
ToolStripMenuItem menuItem = new ToolStripMenuItem(itemDef.Title);
// Add event handler (implemented as lambda expression in this example)
menuItem.Click += new EventHandler(
(_sender, _eventArgs) => {
MenuItemDef mnuItemDef = (MenuItemDef)((ToolStripMenuItem)_sender).Tag;
mnuItemDef.Execute(mnuItemDef, project1);
}
);
// Set menu item properties
menuItem.Tag = itemDef;
menuItem.Name = itemDef.Name;
menuItem.Enabled = (itemDef.IsFeasible && itemDef.IsGranted(project1.SecurityManager));
menuItem.ToolTipText = itemDef.Description;
// Set icon and the background color rendered as transparent
menuItem.Image = itemDef.Image;
menuItem.ImageTransparentColor = itemDef.ImageTransparentColor;
// Insert the created menu item into your ContextMenuStrip
myContextMenuStrip.Items.Insert(insertPos, menuItem);
}
}
}
|
| 7. | Create an event handler for ContextMenuStrip.Closed. In this event handler, you simply remove the created menu items from the ContextMenuStrip and dispose them: |
private void myContextMenuStrip_Closed(object sender, ToolStripDropDownClosedEventArgs e) {
for (int i = myContextMenuStrip.Items.Count - 1; i >= 0; --i) {
// Delete and release inserted items
if (myContextMenuStrip.Items[i].Tag is MenuItemDef) {
ToolStripItem menuItem = myContextMenuStrip.Items[i];
myContextMenuStrip.Items.RemoveAt(i);
menuItem.Dispose();
}
}
}
|
| 8. | Run your application and load/create a diagram. For this example, you need a diagram with layers. |

A custom context menu with menu items created from MenuItemDefs.


